he following factors are to be considered in the selection of a site for brick earth:
- The site to be selected should be capable of providing an adequate quantity of soil during the entire planned production period.
- Additional materials, such as sand or silt, required to make good bricks should also be available near the site.
- Water and fuel should also be available near the site; otherwise extra cost may be incurred for transport.
- It should be connected by road and rail for easy conveyance of the produced bricks.
- The ground of the site must be situated as a plain ground.
- The location of the water table should be at a deeper depth.
3.4 MANUFACTURING OF BRICKS
The manufacturing of bricks involves four stages, viz., preparation of soil, moulding, drying and burning.
3.4.1 Preparation of Soil
1. Removal of Top Soil
The preparation of soil involves first renewal of loose materials at the top of the ground for a depth of about 200 mm. As it contains a lot of impurities, this material is not used for the preparation of bricks.
2. Digging and Spreading
The earth is dug out 200 mm from the ground. The soil is spread on the level ground, and heaps of clay are about 600 to 1200 mm.
3. Cleaning
The soil after being spread on the ground should be cleaned of stones, pebbles, vegetable matter, etc. If non-clay materials are in excess, the clay should be washed and screened. Such a process will be expensive and cumbersome. All the lumps of soil should be broken into a powder form.
4. Weathering
The soil is then exposed to the atmosphere for softening or mellowing. The period of exposure may last for a few weeks depending on the nature of soil. This imparts plasticity and strength to the soil.
5. Blending
To increase the quality of soil, additional soil such as sandy or calcareous clays may be added in suitable proportions with a small quantity of coal, ash, etc. The whole mass is mixed uniformly and water is added.
6. Tempering
It is the process of kneading the soil under the feet of men or cattle after adding the necessary quantity of water in order to make the soil stiff and homogeneous. In general, a soft plastic clay could be prepared by using about 25 to 30% of water. This procedure is adopted for the majority of common handmade bricks. For making superior bricks on a large scale, the earth is tempered in a pug mill.
A pug mill comprises of a truncated conical tub of 120 cm diameter at the top and 75 cm diameter at the bottom with a height of about 180 cm. A long vertical shaft is placed at the centre (Fig. 3.1). The central shaft is provided with a number of horizontal arms attached with cutting knives for breaking clay lumps, if any. A long horizontal arm is fitted at the top of the vertical shaft. The shaft is rotated with the help of bullocks or sometimes by electric power. Clay and water in the ratio of 1:3/4 are fed into the vessel from the top. The tempered clay is collected from the hole provided at the bottom of the vessel. This type of pug mill, as shown in Fig. 3.1, can be used to get sufficient soil for a daily output of about 20,000 bricks.

Figure 3.1 Pug mill
3.4.2 Moulding of Bricks
Bricks are made in traditional size (in inch) and in metric size (cm) as prescribed by the Bureau of Indian Standards. Metric size bricks are called modular bricks. Nominal size of bricks is the size including thickness of the mortar. Hence, the actual size of modular bricks is 19 cm × 9 cm × 9 cm and the nominal size of modular bricks is 20 cm × 10 cm × 10 cm.
A brick mould is a rectangular box of steel or wood. Both ends, the top and bottom, of the box are open. The inside dimensions of the mould are 20 cm × 10 cm × 10 cm (Fig. 3.2).
Moulding of bricks is carried out either by hand or by machine.

Figure 3.2 Typical steel brick mould
1. Hand Moulding
Two types of hand moulding, viz., ground moulding and table moulding, are adopted in India. In hand moulding, bricks are moulded manually. This is preferred in areas where the manpower is cheap and available readily and where only a small quantity of bricks is needed.
(i) Ground Moulding
The process of moulding bricks on the ground by manual labour is called ground moulding. At first a level ground is prepared, and a thin layer of fine sand is spread over the ground.
The mould is wetted and placed on the ground firmly. The tempered brick earth is dashed into the mould. The earth is pressed in the mould such that the earth fills all the corners of the mould without leaving any air gap within the brick. The excess earth is removed using a wooden or metal strike dipped in water.
The mould is then lifted, and the raw brick is left on the ground. The mould is cleaned, dipped in water and placed near the previous brick; the process is repeated till the ground is completely covered with the prepared raw bricks. On an average, a moulder can mould about 750 bricks per day. When the bricks have sufficiently dried they are taken to the drying shed and placed in an ordered manner.
Brick prepared by dipping moulds in water every time called slop-moulded brick, and if sand is sprinkled on the sides of the mould, the brick is called a sand-moulded brick.
(ii) Table Moulding
Table moulding is done on a table of size 2 m × 1 m × 0.7 m instead of on the ground. The process of moulding is almost similar to ground moulding except for a few changes.
Invariably, table-moulded bricks are provided with a frog. A frog is a mark of depth of about 10 to 20 mm provided in a mould. This serves two purposes, viz., it provides a key for the mortar when the next brick is placed with its flat surface over this and to place the trademark of the manufacturer.
A stock board of the same site as the inside dimensions of the mould with a projection for the frog with the trademark of the manufacturer is kept on the moulding table, and the moulder stands behind the table.
The mould is placed to fit the stock board and the tampered earth is dashed against the mould, carefully filled, and excess earth is removed. Then a thin board called the pallet board is placed on the mould; the mould and pallet board are lifted together followed by lifting the mould leaving the brick on the pallet board. Another pallet board is kept on the brick and carried to the drying yard where it is placed on its edge and the pallet boards are removed. This procedure is repeated. Figure 3.3 shows a moulded brick lying over the pallet board.
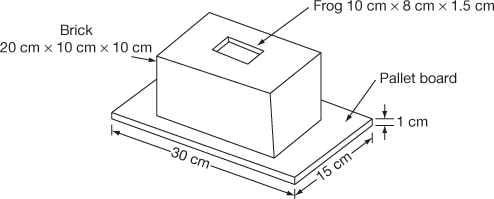
Figure 3.3 Moulded brick lying over the pallet board
2. Machine Moulding
Moulding machines are used when a large number of bricks are to be manufactured within a short time. Machine-moulded bricks are heavier and stronger than the hand-moulded ones. These bricks have a sharp regular shape and size, a smoother surface and sharp edges.
There are two types of machine moulding, viz., plastic method and dry method.
(i) Plastic Method
In the plastic method, pugged earth is used. The machine adopted for the plastic method contains a rectangular opening of size equal to the length and width of the brick. The pugged earth is placed in the machine and a beam of the moulded earth comes out. This is cut into strips of width equal to the depth of the brick by wires fixed in the frames. These bricks are also known as wire-cut bricks.
(ii) Dry Method
In the Dry Method, the machine first converts the hard earth into a powder form. A small quantity of water is added to the powder to form a stiff plastic paste. The plastic paste is placed in the mould and pressed by the machine to form hard and correct-shaped bricks. These bricks are called pressed bricks. Such bricks do not require drying and can be sent directly to the burning section.
3.4.3 Drying of Bricks
Moulded bricks can not be burnt directly as they may get cracked or distorted. Hence, before burning they are dried. Natural drying or artificial drying may be resorted to. The bricks are left to dry for about two weeks.
1. Natural Drying
It is also called hack drying. It comprises placing moulded bricks in rows on their edges on a slightly raised ground called a hack. A small space is given between bricks for the circulation of air. Direct exposure to sun is avoided by providing a cover and it is also protected from the rain. The air- and sun-dried bricks are strong enough and can be used for the construction of small structures.
2. Artificial Drying
When bricks are needed continuously and to a large scale, artificial drying is resorted to. The bricks are dried in special dryers which receive heat from special furnaces that are made especially for this purpose. Hot flue gases from the chambers of a kiln and waste steam from engines may also be used for the artificial drying of bricks.
3.4.4 Burning of Bricks
Bricks are burnt in kilns after moulding and drying so as to impart hardness and strength and to increase the density of the brick so that it absorbs less quantity of water.
Physical and chemical changes take place in burning of bricks. Heating brick earth up to about 640°C produces only physical changes. At this temperature moisture and water of crystallization are driven out, and the organic matter is burnt. Such a brick that can absorb moisture from the air can get back hydrated. Such bricks are said to be poorly burnt and disintegrate when subjected to moisture contact.
If brick earth is heated up to 700–1,000°C, it undergoes chemical changes. During chemical action alumina and silica in brick earth fuse together resulting in a compound which is strong and stable. After this chemical transformation, it does not turn back to break earth on cooling. Further, it does not crumble when immersed in water. Thus, the break earth burnt above 700°C is different from the original brick earth. Hence, to get a good quality brick it has to be heated to the required temperature.
On heating the brick earth beyond 1,300°C, the above materials get vitrified. The bricks begin to lose their shape.
1. Clamp or Open Kiln
Clamp or open kiln is a temporary structure where dried bricks are stacked in alternate layers of fuel, i.e., both bricks and fuels are placed in alternate layers. Locally available materials such as grass, rice, husk, wooden chippings, cheap quality woods and dried cow dung are used as fuel. About 20,000 to 1,00,000 bricks are available after burning and cooling. It takes around 3–6 months to complete the burning and cooling of the bricks (Fig. 3.4) in the clamp.

Figure 3.4 Typical arrangement of fuel and bricks in clamp or open kilns
The main advantages of this method are that its initial cost is low, fuel cost is low and there is no need of a permanent structure and skilled labourers. The regulation and circulation of heat are not possible, and hence only 60% of good-quality bricks can be expected. Further, only a small quantity of bricks can be manufactured at a time.
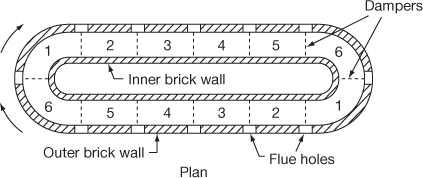
2. Intermittent Kiln
When a large quantity of good-quality bricks are needed, intermittent or continuous kilns have to be used. In intermittent kilns, the process of burning is discontinuous.
Figure 3.5 shows the plan of an intermittent kiln. The operations are in the order of loading the bricks, firing, cooling and unloading, which are performed one after the other. It is rectangular in shape with thick outside walls and is constructed over the ground.

Figure 3.5 Plan of an intermittent kiln
Trenches are dug across the floor of the kiln. Small openings are made in between the trenches. Sun-dried bricks are laid above the trenches with the bricks being laid on edges with gaps in between. This gap enables the hot flue gases to flow to each brick.
Flue gases are let in through the longitudinal walls through the small openings. Dampers are provided in the flue openings to regulate the air supply. Circulation of flues is kept up for 3–4 days. The bricks are cooled for a week’s time.
3. Continuous Kilns
In continuous kilns, the process of burning is continuous. There are three types of continuous kilns, viz.,
- Bull’s Trench Kiln
- Tunnel Kiln
- Hoffman’s Kiln
(i) Bull’s Trench Kiln
This type of kiln is usually oval in plan and is constructed in a trench excavated in the ground. It may be fully underground or partly projecting above ground. The depth of trench is about 2 metres. The outer and inner walls are constructed of bricks, and the flue holes are provided in the outer walls (Fig. 3.6). Dampers are provided to conveniently divide the kiln into sections.
1. Loading 2. Empty 3. Unloading 4. Cooling 5. Burning 6. Heating
Figure 3.6 Bull’s trench kiln
Bricks are arranged in sections in such a way that flues are formed. Fuel is placed in the flues, and the top surface is covered with earth and ashes to prevent the escape of heat. The fuel is burnt through the flue holes. Additional flue holes are provided at the top to insert fuel when burning is in progress. Two movable chimneys are used to form a draught. These chimneys are placed before the section is fired. This arrangement makes the hot gases leaving the chimney warm up the bricks in the next section. When the burning is over in a section the flue holes are closed and the bricks are cool down gradually. The fire is advanced to the next section and the chimneys are moved forward.
As loading, burning, cooling and unloading are carried out simultaneously, a continuous supply of bricks is available. This is the mostly used kiln in India.
(ii) Tunnel Kiln
This kiln is in the form of a tunnel which may be of any shape in plan, viz., straight, circular or oval. The zone of fire is at one place. The moulded bricks are loaded on a trolleys, which are moved from one end of the tunnel to the other end. During this process when they approach the zone of fire that are completely dried and pre-heated.
These bricks are burnt in the zone of fire and are then moved for cooling. After adequate cooling, the bricks are unloaded. As the temperature can be controlled, better quality bricks are produced. The bricks from this kiln are said to be economical.
(iii) Hoffman’s Kiln
This is constructed over the ground to produce a continuous supply of bricks on a large scale.
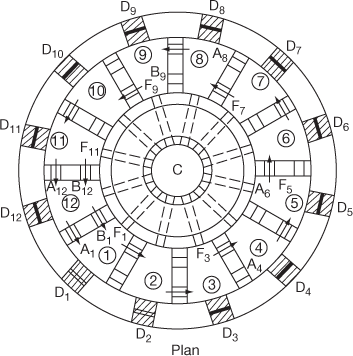
D1 to D12 – Main doors; D1 and D2 – Opened doors, D3 to D12 – Closed doors
1 to 12 – Chambers; C – Chimney, F1 to F12 – Radial flues
A1 to A12 and B1 to B12 – Communicating doors
Figure 3.7 Hoffman’s continuous kiln
This is circular in plan and is provided with a chimney at the centre. Around the chimney are 12 chambers that are in an annular shape. Each chamber comprises of the following parts (Fig. 3.7):
- A main door for the loading and unloading of bricks (e.g. D1).
- Communicating doors for the flow of flue gases between the chambers (e.g. A1 and B1).
- A radical flue from each chamber to the chimney (e.g. F1).
- Fuel holes for providing fuel, and powdered coal is used as fuel.Functions that occur in the chambers are listed below:Chamber 1 – LoadingChambers 9–12 – Drying and pre-heatingChambers 7 and 8 – BurningChambers 3– 6 – CoolingChamber 2 – Unloading
The working of a kiln is as follows:
- Cool air enters through Chambers 1 and 2 as they are open doors.
- It crosses the cooling Chambers 3–6 and enters the burning Sections 7 and 8 in a heated condition.
- It moves to Chambers 9–12 to dry and pre-heat the raw bricks.
- It escapes into the atmosphere through the damper of Chamber 12 and the chimney.
The flow of air and fuel gas are shown by arrows in each chamber. Although the initial cost is more, Hoffman’s Kiln claims several advantages:
- High-quality bricks with uniform burning are obtained with regulation of heat.
- Supply of bricks are continuous in all seasons because the top of the kiln is closed, and the working is not stopped.
- Considerable saving in fuel due to pre-heating of raw bricks by fire gases.
- No air pollution in the locality, as the exhaust gases do not contain black smoke or dust particles.
Leave a Reply